NOTOC 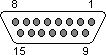 15 PIN D-SUB FEMALE at the computer
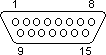 15 PIN D-SUB MALE at the joystick cable
| Pin | Name | Dir | Description |
|---|---|---|---|
| 1 | +5V | OUT | +5 VDC |
| 2 | /B1 | IN | Button 1 |
| 3 | X1 | IN | Joystick 1 - X |
| 4 | GND | - | Ground |
| 5 | GND | - | Ground |
| 6 | Y1 | IN | Joystick 1 - Y |
| 7 | /B2 | IN | Button 2 |
| 8 | +5V | OUT | +5 VDC |
| 9 | +5V | OUT | +5 VDC |
| 10 | /B3 | IN | Button 3 |
| 11 | X2 | IN | Joystick 2 - X |
| 12 | GND | - | Ground (shared with MIDI_OUT, see PC MIDI + game port) |
| 13 | Y2 | IN | Joystick 2 - Y |
| 14 | /B4 | IN | Button 4 |
| 15 | +5V | OUT | +5 VDC (shared with MIDI_IN, see PC MIDI + game port) |
Axis signals
These pins are analog inputs and must be between 0 and 5 volts, 0 volts represents 0 (00000000 in binary) and 5 volts represents 255 (11111111 in binary). When a digital joystick is used, they generaly send a 2.5 volts signal when no buttons is pressed, go down to 0 volts when the up or left button is pressed and 5 volts when the down or right button is pressed.
Buttons signals
These pins are TTL level signals, they are normally high at logical level 1 and when a button is pressed they go low to logical level 0. Note: Direction is Computer relative Joystick.
Types of joystick and actual connection to the port
Analog joystick
The original joystick on the PC was an analog joystick, wich is
composed of two fire buttons and two potentiometers for each axis
(X and Y). The potentiometers used on this type of joystick are
linear type with a value of 100 k ohms, and are wired as in figure
1. 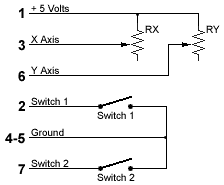 Figure 1: ANALOG JOYSTICK
Digital joystick
A second joystick type started in the early 80’s, it was based
on a digital circuit, it replaced the potentiometers with regular
digital (on/off) switches, it was also known as an atari style
joystick. And when Nintendo came out with the know well known
joypad many companies like Gravis came out with PC joypads. These
types of joysticks pretty much work all the same and are typically
wired as in figure 2. 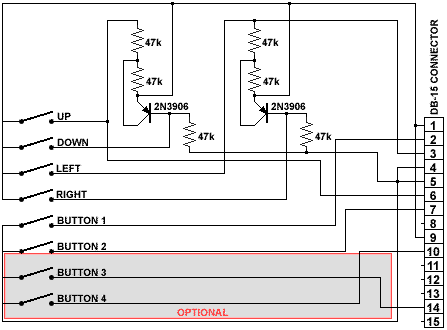 Figure 2: DIGITAL JOYSTICK
The optional part of the above figure should only be connected
when a four button joystick is required. If a second joystick is to
be connected to the same port, a two button joystick should be
used, because the 3rd and 4th buttons are connected to the 1st and
2nd button of the second joystick. If the joystick used has a 3rd
or even a fourth button, you could also add a rapid fire repeater
to it. An common way to add this feature, if you have the room for
it, is to use a simple circuit like in figure 3, it uses a 555
timer to witch is enabled when you press the button, and sends
pulses at about 400Hz to the computer input, you could even make an
inline box adapter that would add auto repeat fire to the existing
buttons of your joystick by simply feeding the signal from the
joystick to the 555 timer and sending the output of it to the
computer. 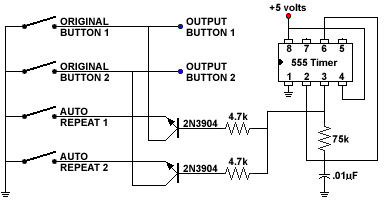 Figure 3: AUTO REPEAT FIRE
When a second joystick is to be used on a single port, you must
first have a port that allows two joysticks to be connected to it
and secondly you need a special Y adapter cable witch can be
purchased at most computer resellers. For those of you who would
like to build there own cable the connections to make one are
explained in figure 4. 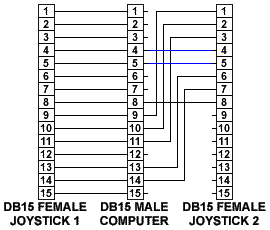 Figure 4: Y CABLE JOYSTICK ADAPTER
This is one way to configure a second joystick and is probably
the best way to do it, some people or manufacturers will replace
the two blue wires connected to pins 4 & 5 of the Joystick 2
connector and will connect them to pin 12 from the computer and the
red wire connected to pin 8 of the joystick 2 connector and will
connect it to pin 15 from the computer. This is ok, but if you have
a midi enabled connector (mostly found on soundcards), the second
way might not work, it could disable the soundcard all together,
because these pins (12 & 15) are used for midi input and output. So
to be on the safe side, the wiring diagram in figure 4 is probably
the safest way to go. If you have already bought a cable and it
doesn’t seem to work wright, it might be that the cable is wired to
pins 12 & 15. One way to overcome this problem is to build a
special adapter wired like in figure 5, this adapter reroutes the
two pins to from pin 5 & 9 and thus isolates the two midi pins.
Note that on a 3 axis joystick(like with a throttle) the Z axis
would go to pin 13 (Y2). The 4th axis, the U axis (like for rudder
pedals), would go in pin 11 (X2). 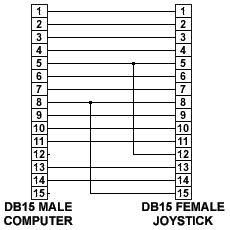 Figure 5: MIDI PIN ISOLATOR
ADAPTER
Figure 5: MIDI PIN ISOLATOR
ADAPTER